
My job is to present. I present every day. Once per day, multiple times, or even whole day. More than a year that we are hit by Covid lockdowns and stuck working from home. This situation required presenting online. Although this was nothing new to me, I learned a lot, and I must admit I improved a lot. Starting today, I start sharing my experience and teach you what I knew and what I learned last year. Some of the things are not new to you, but for sure you will learn something.
This blog series will be all about presenting online, delivering demos, whiteboarding, and all using Microsoft Teams. The photo above represents the primary tools I use every day to communicate with my customers.
This blog post is the first from this series of blog posts.
- Deliver online presentation like a pro - Part 1: Setup your virtual environment (you are here)
- Deliver online presentation like a pro - Part 2: PowerPoint essentials (coming)
- Deliver online presentation like a pro - Part 3: How to present PowerPoint using Microsoft Teams (coming)
- Deliver online presentation like a pro - Part 4: How to demo using Microsoft Teams (coming)
- Deliver online presentation like a pro - Part 5: How to whiteboard using Microsoft Teams (coming)
Let’s get started.
Use multiple virtual desktops
The virtual desktop in Windows 10 is an incredible feature, especially when you need to share your screen while presenting. You can separate your personal and work workspace on a different virtual desktop. Although this is not new nor requires too much explanation, it is a critical first step of delivering good presentations. De-cluttering the workspace and focus only on the demonstration is the primary point.
On the taskbar, select Task view > New desktop or Win+Ctrl+D. Once you create the virtual desktop, you can switch between desktops using Win+Ctrl+ Left or Right Arrow depends which virtual desktop do you want to access.

Now you have a fresh new virtual desktop for presenting, but that didn’t clean your desktop. If your desktop looks like mine, like a mess, then read the next step.
If you are interested to learn more about virtual desktops, check the article manage virtual desktop like a pro in Windows 10
Hide your desktop mess
Before you start your presentation or your demo, it is time to tide your messy desktop. My desktop is quite often messy, full of icons, but thanks to this feature, looks neat all the time. Sharing your chaotic desktop can look unprofessional but as well can show some information that can be sensitive. Of course, not saving files on your desktop is best, but let’s be honest, who doesn’t.
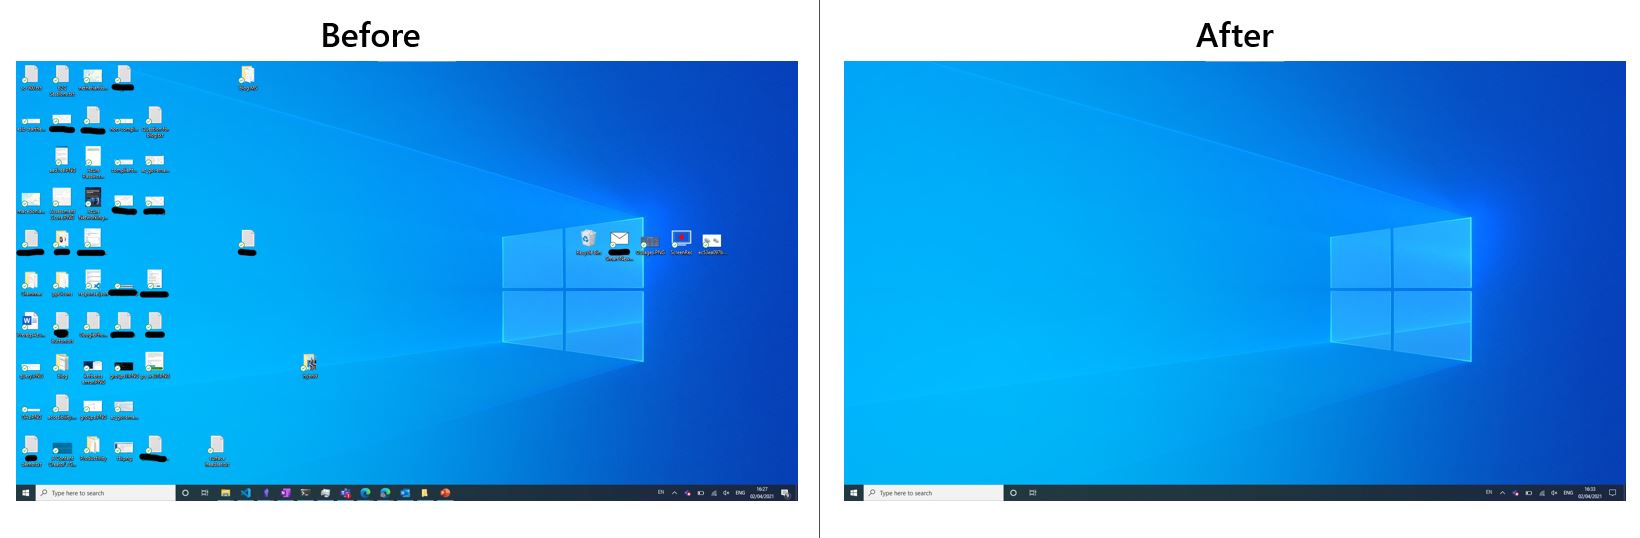
In the end, if you do save things on your desktop, it is easy to hide them while presenting. Right-click on desktop, select View and then select Show desktop icons.
![]()
Now your desktop icons are gone, and your desktop looks amazingly clean.
Where is my mouse pointer?
How many times, when you are presenting, especially when you have multiple screens, you lost your mouse pointer? “Where is my mouse pointer” is a phrase that I hear from people presenting quite often. And while they are looking for their pointer, I will show you how easy it is to find yours.
Launch the Settings app (Win + I), click the “Devices” category, and in the left menu of the settings category, click “Mouse.” Click on the Additional mouse options from the right side Related settings menu. Go to the “Pointers Options” tab and enable “Show location of pointer when I press the CTRL key” and click OK.
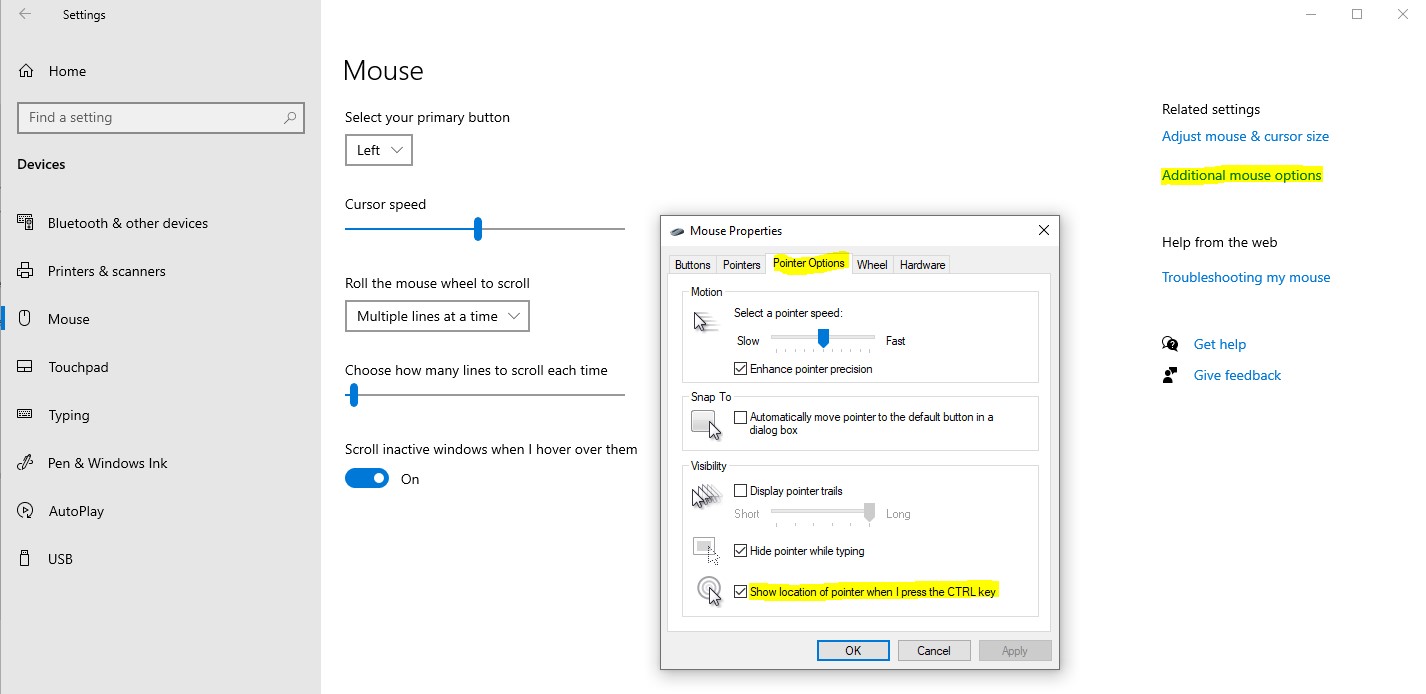
Press CTRL, see the magic? You found your mouse pointer.
Using ZoomIt
ZoomIt is a tool part of the SysInternals tools suite. It is a screen zoom and annotation tool. ZoomIt has many features, but I will discuss only the ones I use regularly. If you demo code, always increase the font size so people can follow. ZoomIt is for zooming on other things than code. When you first run the tool, press Ctrl + 1 and move your mouse to zoom on any part of your screen.
When I need to point to something important, I use the Arrow or Rectangle drawing feature from many others. If you press Ctrl + 2, you are in drawing mode, and then you need to hold Ctrl to draw a rectangle or hold Ctrl + Shift to draw an arrow. If you are in zoom mode and want to mark, then right-click on your mouse and then again hold Ctrl or Ctrl + Shift to draw the same forms. If you made a mistake and want to erase the last drawing, use Ctrl+Z, or E to erase everything.
The third feature of ZoomIt that I use is the countdown timer. Many times when I deliver a full-day workshop, we take small or big breaks. Once we agree on how long the pause will take, I change the time in ZoomIt, and I press Ctrl + 3. That will show you a countdown timer on your screen so your attendees can follow when you are back presenting.
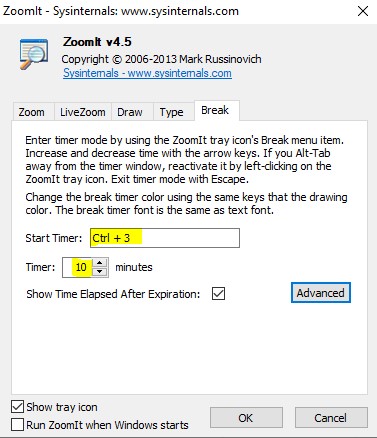
Of course, you can create a custom countdown timer slide in PowerPoint, but for that, you will need to modify your PowerPoint presentation each time you take a break. Using ZoomIt is much easier and does not require adjusting the slides.
ZoomIt - Windows Sysinternals
Dedicated browser profile for demo
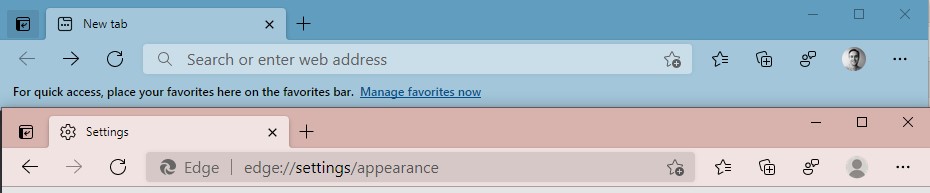
When you present using a browser, you do not want people to look into your bookmarks, browser history, downloads, etc. That is why Edge or Chrome multi-profile comes in handy. I prefer Edge over Chrome because of the single sign-on features for corporate and personal (outlook.com) accounts.
I have separate profiles dedicated to presenting. Mainly I use two profiles, one for my administrator demo tenant account and one for the demo user. One feature that I love in the latest Edge version 91 (at the moment of writing the blog post, you need to be in the Dev channel for this feature) is choosing different Edge appearances per profile. So while I demo, looking at the edge profile color, I immediately know which user I’m using. The admin profile has red browser skin and the demo user blue. This way, I never confuse between the two personas I demo.
More details on using multiple profiles with Microsoft Edge
VS Code extension for hiding secrets
When you demo code using Visual Studio Code, it is critical to hide your secrets and not expose them to your audience. There are two extensions that you can use to hide your secrets in YAML or ENV files.
Cloak
Hide My Secrets
You can’t hide secrets from all file types using these extensions. Therefore you need to take care that you do not demonstrate secrets that after your presentation can be abused. If you ever show your secrets, reset them after your demo.
Summary
I hope you found valuable the first article, and you learned some new tips and tricks. If you have extra tips and tricks to share, leave them in the comments below and share the word further using the share buttons.